A crop party is a modern quilting bee. A group of friends gather to have girl friend time, sharing joys and sorrows while preserving memories and creating a special keepsake.
Showing posts with label Heart 2 Heart Challenges. Show all posts
Monday, January 30, 2017
Round and Round and Round We Go
The ladies over at Heart 2 Heart Challenges must have had a sneak peak at this Freshly Made Sketch when they selected "Round and Round" as a challenge theme:
This note card uses an old Stamp of the Month, "A Happy Hello" to showcase some of Close to My Heart's newer colors plus an oldie but goodie. The Lemon ring was stamped directly onto the card. The other circles were stamped onto White Daisy cardstock and cut out. The flower is from my stash of Just Blooms paper shapes. Here is the inside:
Thank you for stopping by! Until next time, Hansi
Materials used, all Close to My Heart unless otherwise noted:
Paper: White Daisy, Lemon, Willow, Blossom, and Pansy cardstock
Ink: Lemon, Pansy, Blossom, Willow, Lagoon
Stamp: A Happy Hello (retired)
Embellishment: Just Blooms paper shape
Monday, August 10, 2015
Happy Belated Birthday to My Sister
My sister takes the most exquisite close up pictures of flowers. I call her the Georgia O'Keefe of photography, so there was no question that Close to My Heart's Someone Special stamp set was the one to use for her birthday card. Nevermind that her birthday was three weeks ago...
I started with the flowers. My original thought was to stamp the base flower with Thistle dye ink and then stamp the shade layer with Gypsy pigment ink and emboss it with Clear Detail powder. As I was pulling out inks I decided to also try Pixie as the base for a flower or two. The Thistle and Gypsy flower was darker than I had imagined it would be and the Pixie and Thistle combination did not have as much contrast as I liked. On a whim I tried Gypsy on Pixie which turned out to be my favorite. I love playing with base and shade flowers and cannot wait to show y'all the new set coming out in September!
While I was at it I embossed the sentiment as well. Next I made the card front following this sketch from Try Stamping on Tuesday:
The Background and Texture paper is from the long retired Babycakes paper pack, but Zoe would work well, too. If you miss having a baby themed paper pack you have only a few more weeks to wait because there is an adorable baby themed pack in the new catalog. I attached the darker flower using thin foam tape and the leaves and lighter flower with regular foam tape. To finish of the front I used a bit of Slate Diagonal Ribbon and some Purple Glitter Gems from a long retired Workshop on the Go. If you like glitter gems, you are going to love the new embellishments.
With the front of the card done it was time to work on the inside. I figured embossing the inside flower would be over kill so I stamped some using regular dye based ink for both layers. Interestingly, the Thistle layer in dye ink showed better against Pixie than the Thistle in pigment form did.
I had to modify the sentiment from the You are Loved stamp set:
This month Heart 2 Heart Challenges is throwing a Birthday Bash and the challenge over at Seize the Birthday is to use embossing of some sort, so I plan to enter this card in those challenges as well. Thank you for stopping by! Now why don't y'all head over to Heart 2 Heart, Try Stamping on Tuesday, and Seize the Birthday to see what others have made. There is even still time to enter the Heart 2 Heart Challenge if you are so inspired. Until next time, Hansi
Materials used, all Close to My Heart unless otherwise noted:
Paper: Babycakes (retired), Pixie, Thistle, Whisper, and Colonial White cardstock
Ink: Thistle, Pixie, Gypsy, Sweet Leaf, Ponderosa Pine (soon to be retired), Olive (retired), with Gypsy and Slate pigment inks
Stamps: Someone Special, You are Loved, and Holiday Tags
Embellishments: Purple Glitter Gems (retired), Slate Diagonal ribbon (soon to be retired), Clear Detail powder
Sunday, February 15, 2015
Iris Folded Hearts
I can finally post my valentines! You see, it has come to my attention that my darling husband reads my blog. Of course I am flattered but this does make posting cards I have made for him somewhat problematic...
This week the ladies over at Heart 2 Heart want to see a Close to My Heart product that we love. Hmmmm. What do I love most about CTMH? The sparkles? The ShinHan markers that allow me to have sparkles in many colors? Thinking back to my introduction to CTMH, the thing that attracted me immediately was the paper. I love all the layers of color and pattern. I have been wanting to try iris folding, which is a cool technique where you place folded strips of paper across the back side of a cut out shape so that the design spirals into the center leaving an opening in the middle that is reminiscent of the iris of a camera lens. Here is a link to a more detailed description and tutorial. The heart pattern that I used can be found here. First I made a practice card which my husband and I gave to our daughter:
I used a very old paper, Sweetheart, and this Sketch from Try Stamping on Tuesday:
I like how the plaid pattern swirled almost looks like marble. To finish the card I used one of the zip strips from Heartstrings which is available through the end of March. That is another cool thing about CTMH's paper: Each background and texture paper has a ready to go border along the edge. I rounded the corners and had a sweet CAS card that reminds me of a Picture My Life card. Now that I had mastered an iris fold heart it was time for the main project, my husband's valentine:
For the background I selected one of my all time favorite papers, For Always. I love the vintage look and all the texture. Although it has been retired as a paper, it lives on in a Picture My Life card pack, so I know I have a fall back when I use up my stash. For the iris folding I used a metallic paper that has been in my stash for so long that I don't remember where I got it. The roses take advantage of something else I like about CTMH's paper, the white core. After I cut the roses out of Champagne cardstock using the Artisite Cricut cartridge (F key, accent 2), I exposed the white core by using a file to remove the color from the edges of the petals. Then I sponged some Blush ink along the inside edge of the spiral before rolling it up using one of my favorite tools, the quilling tool. Before I got it I used to roll flowers using a knitting needle which did not roll nearly as smoothly.
If I had been making a flower using a dark color and wanted to edge the petals in another color I could have sanded the petals to expose the white core and colored the edge with ink like I did here:
After stamping the sentiment I used a border punch from ek success to punch one scallop's worth of the pattern on each end and then added narrow strips of the metallic paper along the edge and tan bitty opaques in the center of each flourish. I attached a bow, sparkle flourish (because y'all know I love sparkles), and more tan opaques in the center of each flower and was almost finished. The completed iris folding on this card was bulkier than on the first card, so the layer would not lie flat. To solve that problem I used lots of foam tape to attach it to the card. The layout is based on this Atlantic Hearts Sketch:
I had a lot of fun with iris folding which means you will be seeing more of it from me in the future. In the mean time, thank you for stopping by! Now how about visiting Heart to Heart, Atlantic Hearts and Try Stamping on Tuesday for some more inspiration? Maybe you could even enter one or more of the challenges yourself. I would love to see your work! Until next time, Hansi
Monday, February 9, 2015
A Freshly Made Heart
It's February, the month of Valentine's Day, so it comes as no surprise that the theme of the first Heart 2 Heart Challenge of the month is "Home is Where the Heart Is." I have to admit that I followed this Freshly Made Sketch pretty closely, but what can I say? I need a few Valentines to enclose in my college care packages.
I started by cutting a heart using Close to My Heart's Art Philosophy Cricut cartridge and some strips from Snowhaven. I applied adhesive to the heart, laid down the strips including a bit of black glitter paper for good measure, flipped over the heart, and cut away the excess. I planned to add some black sparkles to the centers of the flowers except that I did not have enough, so I used a black ShinHan marker to color some clear bitty sparkles and used those instead. I ran a sponge with black ink along the very edge of the heart and the polka dot strip with black to help them stand out. Black hemp, red enamel hearts, and a sentiment from the Holiday Tags stamp set complete the card.
Thank you for stopping by! Now why don't you check out Freshly Made Sketches and Heart 2 Heart Challenges for some more inspiration? You have until the end of the month to enter any of the February Heart 2 Heart challenges. Until next time, Hansi
Materials used, all Close to My Heart unless otherwise noted:
Paper: Snowhaven, black glitter paper, black, red, and white daisy cardsstock, black glitter paper
Ink: Black with black ShinHan marker
Stamp: Holiday Tags
Embellishments: red enamel hearts, bitty sparkles, black hemp (retired)
Sunday, February 1, 2015
Heart 2 Heart Birthday Color
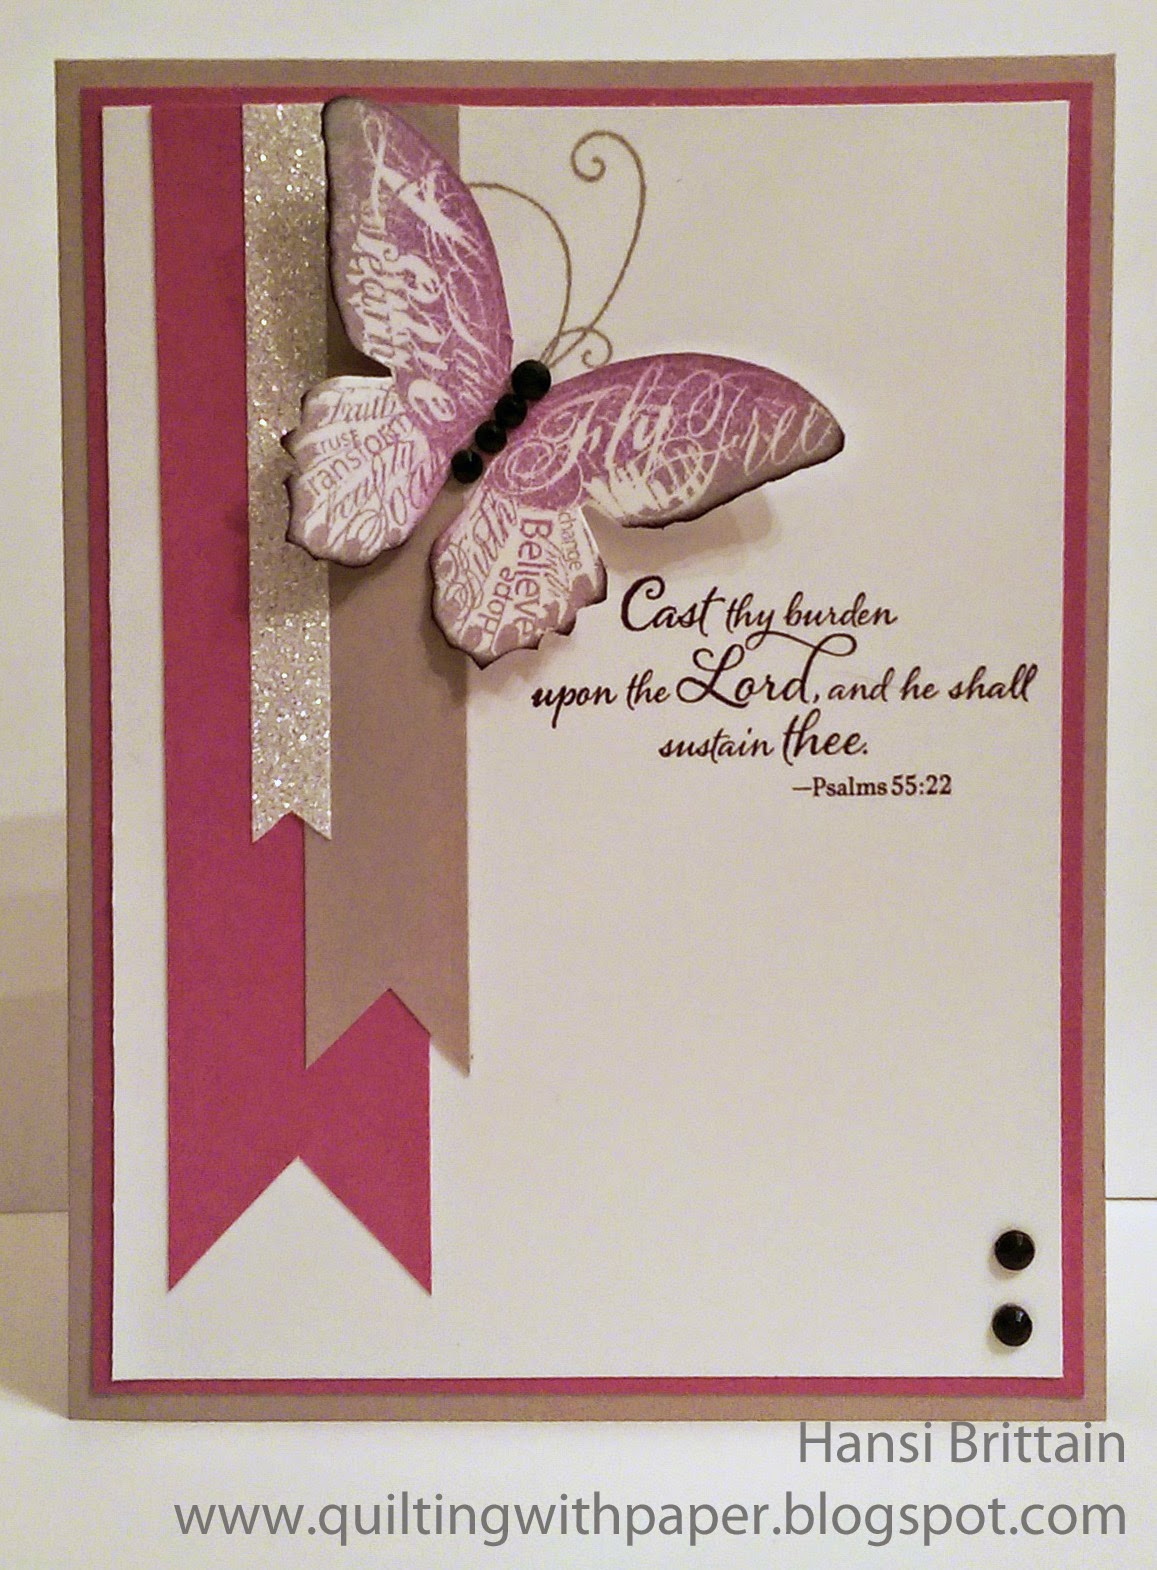
One last card just under the wire for the Heart 2 Heart January challenges: For this challenge you are assigned a color based on your birth month. My birthday is in March which means I made a card featuring Thistle, one of Close to My heart's new colors. I need a sympathy card for a friend from my church, so it was a no brainer for me to go to the "Look to the Light" stamp set for a comforting Bible verse and my favorite stamp, the butterfly from the retired "Find Your Style" set. I inked it up with Thistle and Whisper using sponger daubers and after cutting out the image sponged a little black along the edges of the wing. I embellished with black sparkles and CTMH's new White shimmer trim.
I used this Freshly Made Sketch for the layout:
Thank you for stopping by! Until next time, Hansi
Saturday, January 31, 2015
Clean and Simple with Heart and February's SOTM
The last Heart 2 Heart challenge of the month is to create something that is clean and simple, so I got out February's Stamp of the Month and started to play. It does not really show in the photos that I embossed some of the images in gold. I had to take the photos with my phone because my "real" camera with the bounce flash is acting up.
This first card may not meet a purist's definition of CAS because it has some embellishments, but the ladies at Heart 2 Heart are allowing for some leeway. I used a black ShinHan marker to fill in the petals of the flower before adding the sparkle to the center.
For this second version I had so much trouble centering the solid black stamp that I ended up stamping it on a scrap and cutting it out with a one inch circle punch:
The sentiments come from the Variety of Thanks set which is available only as a hostess reward through March 31st. I love all the curly cues! Thank you for stopping by! Until next time, Hansi
Materials used, all Close to My Heart unless otherwise noted:
Paper: Colonial White and Black cardstock
Ink: Black with Black ShinHan marker
Stamps: A Happy Hello (Stamp of the Month available during February only), Variety of Thanks (available as a hostess reward though March 31)
Embellishments: Black Sparkles, Ranger Gold embossing powder
Making the Old New with Heart
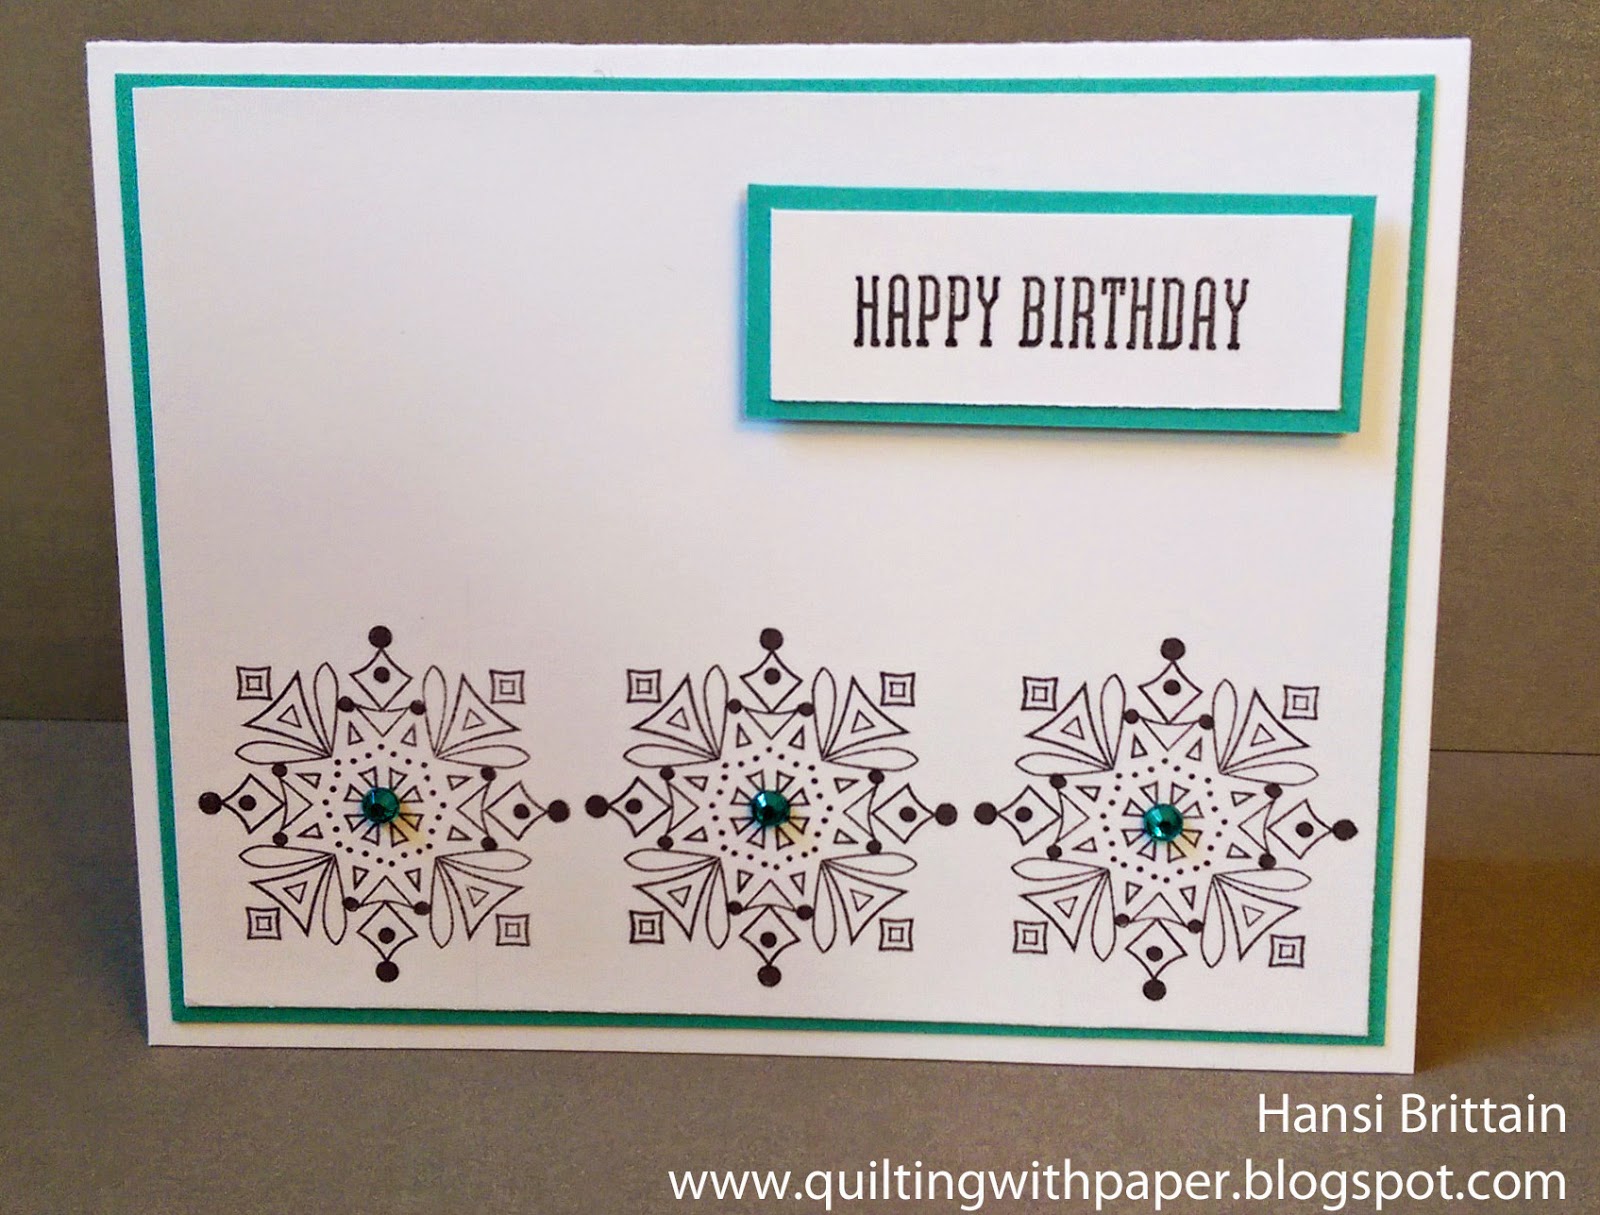
In honor of the new year, the ladies over at Heart 2 Heart want to see something old used in a new way, so I rotated the Snowflake mini from the Christmas before last to create a row of Art Deco(ish) tiles following this Atlantic Hearts sketch:
First up was with a pop of Lagoon with sparkles colored with my ShinHan marker in Peacock Teal:
Next I tried a few more pops, this time in Pixie, and upped the contrast with some black layers:
Lastly I did one in black and white:
One thing I learned is that I am much better at coloring small circles than I am tiny triangles, so I embossed the images with clear detail powder to help me stay within the lines. This reminds me of the original bathroom in my 1930"s house.
I am also going to enter the pink card in the Seize the Birthday Anything Goes Challenge which is a new challenge blog for me. Thank you for stopping by! Now please head on over to Seize the Birthday, Heart 2 Heart and Atlantic Hearts for some more inspiration. Until next time, Hansi
Sunday, January 18, 2015
Merry Penguins
This week's Merry Monday challenge is to create a Christmas card featuring critters with this inspiration photo:
Cute little critter plus snow meant only one thing: the ice skating penguin from a retired Close to My Heart set, Winter Wishes. I embossed him with clear detail powder to help him pop, colored him with a ShinHan marker, and while I was coloring, colored a bitty sparkle to give him a sparkle butt. Amy Kiger would be so proud! I wanted to use this sketch from Freshly Made Sketches and pop up the center panel like several of the designers did. They call them inspiration projects for a reason...
There was one problem. I wanted to make a border using use a strip cut from Snowhaven which had black on each side. I was concerned that with the center popped up, you would be able to see the edge of the border if I used a white card base. The solution was to use a black card base. To keep the white core from showing I ran the edges of the borders across a black ink pad. This is what the card looked like without the center panel:
To make the center panel I used the Cricut Design Space to cut the opening and then embossed it using a folder by Darice. Anytime I am going to emboss a shape or something with an opening I always do all the cutting first so that I can position the paper in the embossing folder so that the embossed design compliments the shape. That is how I got the snowflakes to dance around the opening. I cut a red and white strip for the horizontal element but decided it was too much red and and that a strip with black and white and a touch of red would work better. Rather than waste the first piece, I used it on the inside:
I used ShinHan markers to put black dots at the center of the flowers and color the ornament and a chalk marker in the ornament's center. This helped integrate the colors.
This card was also an opportunity to relive my childhood and play Tic-Tac-Toe with the ladies over at Heart 2 Heart Challenges:
Sketch plus Cricut plus embossing gives me three in a row horizontally. This might even be a two way if you consider that this card could be suitable for a guy.
Now I have two Christmas cards ready for next year. Thank you for stopping by! Now why don't you visit Merry Monday, Freshly Made Sketches and Heart 2 Heart for some inspiration and maybe enter them yourself? I would love to see your work! Until next time, Hansi
Materials used, all Close to My Heart unless otherwise noted:
Paper: Snowhaven, Black, White Daisy, and Cranberry cardstock
Ink: Black pigment and dye inks, Black and Carmine ShinHan markers
Stamp: Winter Wishes (retired)
Embellishments: Bitty Sparkle, red baker's twine from Michael's, black button (retired)
Other: Snowflake embossing folder by Darice, Art Philosophy Cricut cartridge
Sunday, December 14, 2014
A Tinsel Town Challenge
The last Heart 2 Heart challenge of the year is to use Silver, Black and Lagoon in a project. At the risk of showing my age, I got to thinking about the artificial trees of my childhood which were aluminum. (Just in case you have ever wondered why Linus knocks on a tree and hears a hollow metal sound when he and Charlie Brown go Christmas tree shopping in "A Charlie Brown Christmas") I knew that I wanted to use this tree from the Holiday Wishes stamp set and that this sketch from Atlantic Hearts was the perfect one to show it off.
First I cut Shape8 using Close to My Heart's Art Philosophy Cricut cartridge and embossed the tree using Ranger's Super Fine Silver embossing powder. To embellish the tree I used a ShinHan Peacock Green marker to color some Clear sparkles and, because I did not have enough Black Bitty sparkles, I used a Black marker to color some Clear ones. How did I get that black border so narrow? Did I use the Cricut Design Space? Sadly, no because I do not have a Cricut Explore (yet). I hope to get one for Christmas as it is at the top of my wishlist and DH is a pretty smart man... In the meantime, on my Expression the default is to cut in .25 inch increments, but if you go into settings, you have the options of .10 inches, centimeter, and millimeter increments. I changed my setting to .10 inches and cut a shape in black which was .10 inch bigger. I had intended on cutting an additional layer using Silver Glitter paper, but I found I liked it with just the black border against the Lagoon background. Because I did not need to allow room for extra layers, I made a second card with the shape8 cut larger enough to include a sentiment from the same stamp set stamped with black pigment ink and embossed with clear detail powder.
I am not sure which card I like best. What do y'all think? Thank you for stopping by! Until next time, Hansi
Wednesday, October 29, 2014
Feeling Witchy
As much as I like Close to My Heart's Eek & Shriek stamp set (In case you don/'t know, I LOVE cats), my favorite Halloween stamp is this sassy witch from the Wicked set which was a available as a Stamp of the Month a few years ago. I stamped her in black and sponged the panel with Thistle, Sunset, and Black inks and while I was at it, sponged around the pieces cut from Scaredy Cat paper with Black. The broom and sentiment come from the Halloween Greetings set available in the current CTMH catalog. You may notice that the embellishment from the Scaredy Cat Assortment has been flipped. I thought it looked better to have the cat facing towards the center, so I peeled off the glue dots and flipped it over. I used liquid glass to attach it to Black glitter paper before attaching it to the card. I love that the metal pieces in the Scaredy Cat Assortment are so thin and flat. This would be the perfect card to enter in the Cards in Envy "Any Witch Way You Can" Challenge except that the only way to make the witch fit and still have room for the other elements in this Heart 2 Heart sketch was to make the card 7x5 inches.
The Cards in Envy Challenge requires that cards be no more that a quarter inch thick and fit in an A2 envelope so that they will be easy to mail. The theme for the current challenges is "Any Witch Way You Can," and since this is such a great witch, I had to made a second card using the same technique but in the A2 size.
This is the last of my cards to enclose in Halloween care packages to the college students in my life. Given that this is National Chocolate Day, my daughter and I had to do a quality control check as we put the packages together. Thank you for stopping by! Now please head on over the Heart 2 Heart and Cards in Envy to see how others have met these challenges. There is still time to enter either challenge if you so are inclined. I would love to see your work! Until next time, Hansi
Materials used, all Close to My Heart unless otherwise noted:
Paper: Scaredy Cat, Black, Colonial White, and Slate cardstock, Black Glitter paper
Ink: Thistle, Sunset, Smokey Plum, and Black ink
Stamps: Wicked (retired), Halloween Greetings
Embellishments: Scaredy Cat Assortment
Sunday, September 14, 2014
My Favorite Stamp
This week the folks over at Heart 2 Heart challenge us to create something using our favorite stamp or stamp set. Now if you have been following this blog for a while, you probably know that my all time favorite stamp is the butterfly from the long retired "Find Your Style" set. Because that stamp is so old I decided to also share my favorite stamp from the current Close to My Heart Catalogue, "Your Own Kind of Wonderful." You might think these are favorite stamps because I love butterflies, but the real reason is that I love to play with color and ink, and these stamps are a perfect way to indulge that passion. Using this sketch from Atlantic Hearts I made a card using each set:
First up is the butterfly from "Find Your Style:"
I like to ink this up using sponge daubers. Since I am never sure how it is going to come out, I usually make several, use the one I like best for that project, and stash the rest in the back of the envelope that the set comes in to use later. This butterfly is one from my stash using Juniper and Sweet Leaf. I sponged around the edges with Saddle and Chocolate and was ready to move on. The center panel is a card from the Skylark Picture My Life set. I got a background and sentiment with no real effort on my part. How cool is that? or the butterfly's antennae, I masked off the body so just the antennae were inked and stamped directly on the card. With a premade butterfly and panel this would have been a quick card if I didn't decide to color the clear sparkle flourish with one of the new ShinHan markers. I love how well the color took! Since this was not going to be a quick card, I stamped the butterfly one more time in Saddle, cut out the body and used the Mahogany marker to add texture. I also stamped a dragonfly with second generation Juniper ink in the upper left of the PML card. I used the Butterfly stamp on the inside of the card as well:
Speaking of ShinHan markers, my next card features the stamp set "Your Own Kind of Wonderful" which is the prefect showcase for them.
I love how vivid the colors are and how well they layer! I heat embossed the butterfly using Black pigment ink and Clear Detail powder. Again, I used a Picture My Life card, this time from the Laughing Lola set. I also did some coloring on the inside:
So now you know two of my favorite stamp sets. What's your favorite? Thank you for stopping by! Now head on over to Heart 2 Heart Challenges and Atlantic Hearts Sketch Challenge to see some more creations. Until next time, Hansi
Materials used, all Close to My Heart unless otherwise noted:
Card 1:
Paper: Juniper and Colonial White cardstock
Ink: Juniper, Sweet Leaf, Saddle, and Chocolate ink, Bronze and Mahogany ShinHan markers
Stamp: Find Your Style (retired), an old Petite Perks set (retired)
Embellishments: Small Clear Sparkle Flourish, Green Sparkle (retired), Bronze Shimmer Trim
Other: Skylark Picture My Life card
Card 2:
Paper: Crystal Blue, Black, and Colonial White cardstock
Ink: Black dye and pigment inks, Lavender, Cerulean Blue, Tender Pink, and Peony Purple ShinHan markers
Stamps: Your Own Kind of Wonderful
Embellishments: Small Black Sparkles Flourish. Black Sparkle, Purple Shimmer Trim
Other: Laughing Lola Picture My Life card
Materials used, all Close to My Heart unless otherwise noted:
Card 1:
Paper: Juniper and Colonial White cardstock
Ink: Juniper, Sweet Leaf, Saddle, and Chocolate ink, Bronze and Mahogany ShinHan markers
Stamp: Find Your Style (retired), an old Petite Perks set (retired)
Embellishments: Small Clear Sparkle Flourish, Green Sparkle (retired), Bronze Shimmer Trim
Other: Skylark Picture My Life card
Card 2:
Paper: Crystal Blue, Black, and Colonial White cardstock
Ink: Black dye and pigment inks, Lavender, Cerulean Blue, Tender Pink, and Peony Purple ShinHan markers
Stamps: Your Own Kind of Wonderful
Embellishments: Small Black Sparkles Flourish. Black Sparkle, Purple Shimmer Trim
Other: Laughing Lola Picture My Life card
Tuesday, July 1, 2014
A Masculine, "Studly" Card for Heart 2 Heart
The theme of one of the Heart 2 Heart Challenges is "So Studly." In other words, they want to see a masculine card, preferably using Durables or some type of metal stud. I was not attracted to the Triangle Durables at all, but having a shortage of masculine embellishments, I ordered some and discovered that I love them! I took my inspiration from this card that I saw on Pinterest (where else?) thinking that it would be quick and easy. It would have been if I didn't have to figure out the dimensions of the pieces! (For the record, clockwise from the upper left: 1 3/8 x 3 1/4, 2 1/2 x 3 1/4, 2 1/2 x 1 7/8, 1 3/8 x 1 7/8) I distressed all the pieces with White Daisy, decided I didn't like it, and sponged Chocolate over top. I like the smudged effect.
This is my last entry for the Heart 2 Heart Challenges for June. Whew! Thank you for stopping by! Until next time, Hansi
Materials used, all Close to My Heart unless otherwise noted:
Paper: Timberline, Bamboo cardstock
Ink: White Daisy, Chocolate, Pondersosa Pine with Whisper alcohol marker
Stamp: Happy Birthday mini
Embellishments: Triangle Durables
Subscribe to:
Posts (Atom)