Viewed straight on:
Viewed straight on:
'Tis the season for stepping up my Christmas card making. To make it easier I have an 8 x 14 lucite bin that I store all my Christmas themed dies, embossing folders, stencils, and leftover die cuts. I keep the stamps separately "filed" in a drawer by theme such as sentiments, snowflakes, trees, religious, etc. Because snowflakes are my favorite design element, I get out all my snowflake dies early in the year and cut multiples of each and keep them sorted in clear "flip flop" pockets. If I need a quick Christmas card I can get out a card base, pick a background from my stash or a trimming from one, add a large snowflake or several small ones, a leftover sentiment or quickly stamp one, add a sparkle in the center of the snowflakes and I have a card. If I have time I can add a few more touches like an extra layer or embossing.
Towards the end of summer I go through my other stencils, embossing folders, and dies and add any that might be useful to my Christmas bin to have handy, Let's face it. Most of the cards I will be making for the next few months will be holiday cards. Last week when I was looking through my embossing folders I found a Sizzix 3D Impresslits Snowflake folder by Tim Holtz hiding in the back which was easy for it to do given that it's only @ 3 x 4.5 inches. It cuts and embosses a 2.75 and 1.75 inch snowflake in one step. Talk about a time saver! I bought it as part of the 2021 release and forgot all about it. It has now lost it's status as a NBUS (Never Been Used Stuff). I used it and the sketch below from CAS Colours and Sketches for the Alphabet K for Keep it Simple Challenge.
I followed the "add a few more touches" version of my quick(ish) formula. I picked a strip left over after trimming a background I made, I don't know how long ago, and swiped the edges with ColorBox silver metallic pigment ink. I put a small scrap of silver foil into the newly rediscovered embossing folder, ran it through my die cut machine and had a 3D snowflake to use now and a small one for my stash. I looked through my snowflake stash and selected one cut using the retired Beautiful Blizzard die from Stampin' Up to layer on the silver one and finished my focal point with a sparkle. I cut a 4 x 5.25 piece of white to add a layer for interest and heat embossed a sentiment from Close to My Heart's Snow Flurries set in silver. All that was left to do is attach everything to the card base and stamp a sentiment inside. In less than half an hour I had a card.
I also plan to enter this in the NBUS, Jingle Belles Cardstock Christmas (no patterned paper), Can You Handle the Pressure Anything Goes Using an Embossing Folder, and Peace on Earth Anything Christmas Goes Challenges. Thank you for stopping by! Until next time, Hansi
It is Christmas in July at the Just Add Ink challenge blog, and it is always Christmas at Peace on Earth Christmas. Although the Peace on Earth challenge is always anything Christmas/winter holiday goes they put up an optional mood board which this time features snowmen. The current challenge at Cut It Up is something monochromatic. After thinking about all three challenges I had my concept.
I embossed a piece of watercolor paper using the Sizzex Winter Snowflakes 3D embossing folder and sprayed it with Tim Holtz Distress mica sprays in Snow Flurries, Juniper Berry, and Brushed Pewter along with water to move the inks around. Once it was dry I ran it through in the embossing folder again to crisp up the impression because all that liquid flattened it out a bit. I used my finger to lightly rub Color Box Silver metallic ink on the raised parts to bring out the snowflakes. Holding the panel vertically I pressed the edges into a Versamark inkpad and then Ranger Super Fine embossing powder and heated them. I put a slightly smaller piece of heavy cardstock behind the panel to give it some lift and attached it to the card base. I used a die from Paper Rose to cut Merry Christmas three times and stacked them for the sentiment. I finished the card with clear sparkles in the center of some of the snowflakes.
I now have two Christmas cards which I can repeat in other colors. Thank you for stopping by! Until next time, Hansi
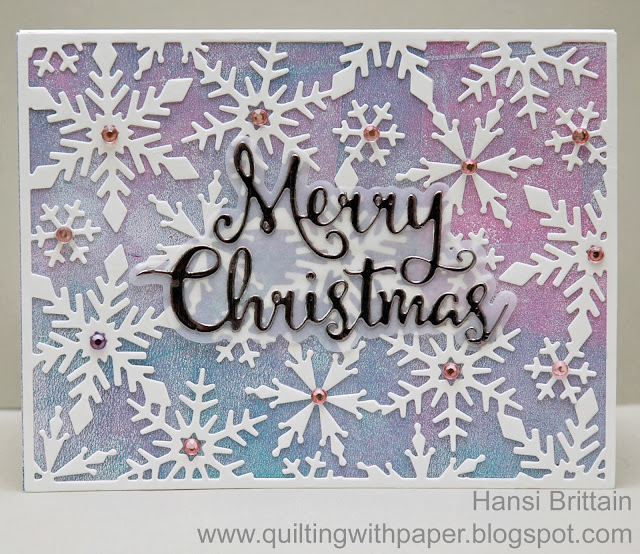
The Jingle Belles want to see what goodies either Santa brought, or we treated ourselves to in the pre or post holiday sales. I happily obliged while having fun playing with my new 8x10 Gel Press, experimenting and getting a feel for applying acrylic paint to it. The colors I used for this background are actually pretty bright, not pastels. After rolling out the paint, I continued to brayer off paint until I had a thin coat, let it dry, and then rolled on a thin coat of white to pull it. I used part of the print to back a die cut made using the Hero Arts Snowflake Pattern Cover Plate die. I used a die set from Pink and Main to cut the sentiment from the darkest sheet from Stampin' Up's Silver Foil Specialty pack. I love the purple cast and lined texture of it. Although it showed against the background, the snowflakes were a little distracting, so I cut the shadow from some vellum which muted the snowflakes just enough to lift the sentiment from the background. I finished my card with some light purple sparkles.
I also plan to enter this in the {PIN}spirational Winter Challenge and Happy Little Stampers Anything Goes With Dies challenge. Thank you for stopping by! Until next time, Hansi
To me, a clean and simple card is more than clean lines and white space, it should be fairly quick to make. One of my ways of making quick(er) cards that don't look thrown together is to keep a stash of backgrounds. Whenever I am playing with a new technique, I make lots of backgrounds and keep them all including the ones I am not pleased with. There is usually a part that can be used to back a cut out window or to die cut a shape or sentiment. I didn't like the one I used for this card, but the part along one side was pretty which was fortuitous because the AAA Cards challenge is to create a clean and simple card with the design along one edge and an optional twist of snow.
First I used the Hero Arts Snowflake Edge die to cut a border on the front of the card. Then I attached the background in question that I made had by smooshing ink spritzed with Hero Arts White Iridescent Shimmer Mist onto watercolor paper behind the front of the card. I embossed a sentiment from the Ornamental Christmas set by CZ Design for Simon Says Stamp in silver and added a strip of silver foil cardstock from my scraps to compliment it. I figured I was pushing the limits of CAS with layers, so I resisted the urge to put clear sparkles in the centers of the snowflakes. I also plan to enter this in the CAS on Friday Christmas Challenge and Addicted to Stamps and More Die Cut or Stencils Challenge.
Thank you for stopping by! Until next time, Hansi
I had been pondering all week how I would use the Paper Players sketch below when I saw this video by Gina K Design.
Essentially you score a piece of cardstock, lightly swipe ink over it, set up the sandwich for embossing a die on your die cut machine, place the panel face down on the rubber mat and the stencil on top, emboss the stencil (which actually debosses it), and then swipe more ink over it. Being in full Christmas card mode, I used a snowflake stencil from Stampin' Up. Rather than use the colored pencil and Gamsol technique Gina used, I lightly colored the snowflake impressions with a colored pencil. I cut 1.5 x 3.75 inch panels, swiped more ink round the edges, and stacked each on two layers of heavy Very Vanilla cardstock for dimension. I attached the outer two panels first and then lined up the middle panel evenly between them. HINT: Pay attention to how the design lines up. I had to perform a card-ectomy because I attached the middle panel upside down.
I had sort of an antiqued brass embellishment I wanted to use to anchor the sentiment, but it did not show well. I tried coating it in gold embossing powder, but it still didn't show, so I tried platinum powder from Ranger which worked, but I did have to sacrifice some of the detail. I like to think it evokes the look of old worn hardware on a wooden cupboard. I used the same powder to emboss the sentiment and gild the edges.
This technique would work well for any masculine card. Thank you for stopping by! Until nexy time, Hansi
This card was designed for the Aud Sentiments Christmas Sentiment, Christmas 24 Simply Snowflakes, and C.R.E.A.T.E. Christmas Non Traditional Colours Challenges. I also plan to enter this into the Peace on Earth Christmas Challenge which is a new anything goes Christmas challenge that posts a mood board for inspiration if you choose to use it ,which I did for this card.
I started with a 9x12 sheet of bristol paper and sprayed it with Dina Wakely Ocean, Turquiose, and Night acrylic gloss sprays and Tim Holtz Brushed Pewter Distress spray until I liked the look. Then I cut off a piece for this card and edged it with Majestic Violet Archival ink from Ranger. I cut the sentiment from silver foil cardstock using the Tim Holtz Retro Merry Christmas die and the snowflakes from white and silver foil cardstocks using dies from Stampin' Up's Snowfall set. I popped the panel up on a white card base and finished the card of with a purple sparkle.
Thank you for stopping by! Until next time, Hansi
I made this card for the ABC Christmas Challenge, V is for Vocabulary, Christmas 24 Challenge, Simply Snowflakes, and the Stinkin' Inkers Challenge, Scrap Happy, using one of the scraps that were left after making this card and others like it. Please excuse the photo quality as it was taken with my phone under a strong overhead light. It does, however, show the metallic shine that is not as obvious in the photos of the card taken in my usual set up with a bounce flash. I used the other two scraps to make cards which I am not entering. You can see them at the end of this post.
To make the backgrounds that I cut the ornaments from I put drops of Hero Arts Glimmer Metallic Inks on my craft sheet, misted them with water and smooshed them onto watercolor paper. To get a second card from each scrap I placed a Hero Arts Snowflake Edge Fancy Die at a diagonal across a 4 x 5 inch piece of white cardstock, taped it in place, made my die cut sandwich with the edge of the top cutting plate so that the plate only covered the part of the paper I wanted cut and then ran it though the machine. You can see this partial die cut technique in action in this Jennifer McGuire video. Because the watercolor paper is so thick, if I backed the snowflakes with a scrap, you would see a ridge in the white cardstock, so I cut a 4 x 5.25 piece of printer paper to use as a backing, attached a 2.25 x 4 inch piece cut from scrap at the top edge to back the snowflakes and a 3 x 4 inch piece of watercolor paper below it to create a level surface and then put the white cardstock with the snowflake edge on top.
I used the die from the Hero Arts Stamp and Cut set to cut the word Peace twice from white cardstock and once from Galvanized Metal cardstock from Stampin' Up and then stacked them. I also cut a 1/8 inch strip and glued it along the bottom of the snow flakes. I embossed a sentiment from the set in silver and underlined it with a very narrow strip cut from the scrap. Lastly, I attached the panel to a white card base and embellished the center of each snowflake with a bitty sparkle.
Here are the other two cards which I am not entering.
The first Jingle Belles challenge in October is always to create a pink Christmas card for breast cancer awareness. The Belles, Stephanie and Lauren, each donate $2.00 for each entry to the Breast Cancer Research Foundation. Although I am not a fan of all the October pink packaging that is essentially a marketing tool to sell more product, I can get behind this because the only entity that will profit financially from this challenge is the Breast Cancer Research Foundation. Also in honor of breast cancer awareness the Dragonfly Dreams challenge theme for October is In the Pink and the Cut It Up theme is pink. I have quite a few friends and family members, including my mother, who are survivors thanks to early detection, so please make sure to do your monthly breast exams, and if you are of that age, go in annually for your mammogram or as I like to call it, The Big Squeeze. In all seriousness, modern technology has made the process less uncomfortable than it was when I first started getting them, and a few minutes of discomfort is worth it if it saves your life. The American Cancer Society has information about risk factors and lifestyle measures you can take to reduce reduce the odds of getting breast cancer. Now enough of the preaching, let's get on to the card.
I started with this Freshly Made Sketch: