A crop party is a modern quilting bee. A group of friends gather to have girl friend time, sharing joys and sorrows while preserving memories and creating a special keepsake.

Thursday, January 13, 2022

A is For Anything Christmas, S is for Snowflake, Sparkle, and Spray


I have some cardmaking goals for this year:

1. Use more of my stash and old supplies rather than just "collect" them.
2. Make at least four Christmas cards a month to avoid the December crush.
3. Learn how to use and experiment with my gel press.

This card furthers two out of three.  The current theme for Shopping Our Stash is Something That Starts with S and the theme for the ABC Christmas Challenge is A is for Anything Christmas and B is for Baubles, hence the title of this post.  

I have a never ending stash of backgrounds because I can never make just one when I get going.  This background is part of a play session with sprays in which I used mostly 9x12 sheets of bristol paper and watercolor paper.  For this particular one I sprayed water and then Bubble Gum Pink Shimmer, Periwinkle Blue, and Vibrant Turquoise Dylusions inks on bristol paper and then smooshed a second sheet flat on it.  When I picked up the top sheet there was still a lot of ink pooling on the bottom sheet, so rather then blot it up with a paper towel I grabbed the first sheet of cardstock I could lay my hands on, Sea Glass from Close to my Heart, and smooshed it on in different spots until I had blotted up the pools of ink.

I used an old Hero Arts Cut Out Christmas Fancy die to cut the top of 4.25 x 4.50 piece which left me with a beautiful, blue and turquoise script Christmas die cut that I could use somewhere else.  Once I attached the panel to a white card base I didn't really like the look of the white showing through the opening so I used the same die to cut the top of a white panel the same size as the first to have a white Christmas die cut to inlay in the opening to give the card a more finished look.   I finished the card off with a silver foil snowflake cut using an old Close to My Heart die, a sparkle, and a strip of silver foil.

If you are keeping track, I had a white twin of the blue and turquoise panel and that blue/turquoise Christmas die cut which I couldn't let go to waste, so I made a second card:


I just love a two for one, don't you?  I also plan to enter this card in the Holly and Ivy Christmas Anything Christmas Goes challenge.  Thank you for stopping by!  Until next time, Hansi


Wednesday, January 12, 2022

More Fun With My New Toy


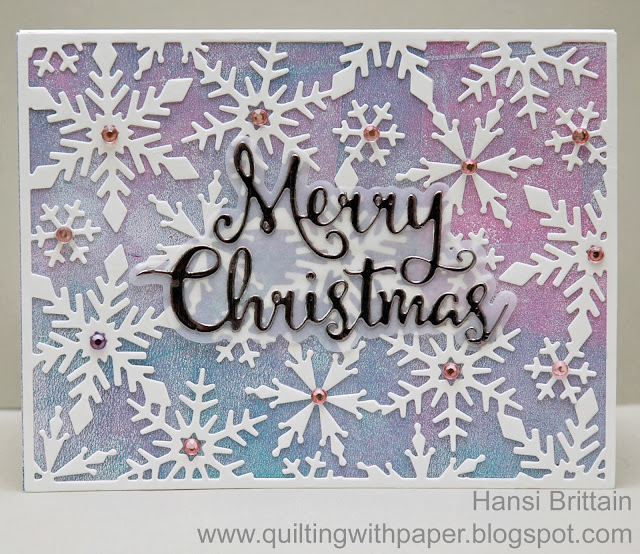
The Jingle Belles want to see what goodies either Santa brought, or we treated ourselves to in the pre or post holiday sales.  I happily obliged while having fun playing with my new 8x10 Gel Press, experimenting and getting a feel for applying acrylic paint to it.   The colors I used for this background are actually pretty bright, not pastels.  After rolling out the paint, I continued to brayer off paint until I had a thin coat, let it dry, and then rolled on a thin coat of white to pull it.  I used part of the print to back a die cut made using the Hero Arts Snowflake Pattern Cover Plate die.  I used a die set from Pink and Main to cut the sentiment from the darkest sheet from Stampin' Up's Silver Foil Specialty pack.  I love the purple cast and lined texture of it.  Although it showed against the background, the snowflakes were a little distracting, so I cut the shadow from some vellum which muted the snowflakes just enough to lift the sentiment from the background.  I finished my card with some light purple sparkles.

I also plan to enter this in the {PIN}spirational Winter Challenge and Happy Little Stampers Anything Goes With Dies challenge.  Thank you for stopping by!  Until next time, Hansi


Sunday, January 9, 2022

New Year, New Toys, New Techniques


I bought a gel press last fall and never had time to play with it, so you could say it is new to me and using it with acrylic paint is a whole new experience.  Acrylics don't behave like ink and have a bit of a learning curve, but you can get effects you can't get with ink.  It is definitely a lesson in letting go because despite your planning, you can never be sure exactly what you are going to end up with.  That's part of what makes it so fun!  Right now I am practicing putting down a layer using different colors of paint and picking it back up on paper, otherwise known as pulling the print.  

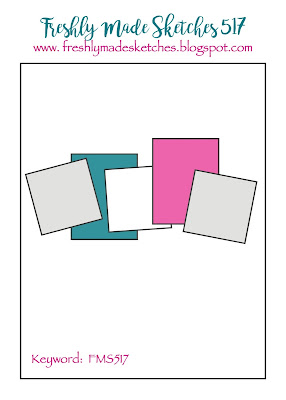
I needed a birthday card for my husband, had a bunch of prints, and saw this Freshly Made Sketch:


I could see little cats sitting/standing in squares cut from my prints just like they were in windows.  Did I mention he is the world's best catdad?  I cut pieces out of several prints, sponged Archival ink along the edges and set about to arranging them, deciding on the more muted colors for the front and using the leftover bolder pieces for the inside below:


I used a die from Obsession Impression that doesn't seem to have a name other than Cat Set (DIE083-K) to cut the cats on the front from glossy black cardstock  and the ones on the inside from regular black cardstock.  I used a Simon Says Stamp die to cut the Happy Birthday from glossy black cardstock, the Kat Scrappiness die set, Pet Sentiments Brush Script Word and Sentiments, to cut the word love, and an old Stampin' Up die to cut the word you.  The card base was cut from Hero Arts Hero Hues Premium Pitch Black 111 lb. cardstock. 

I am also entering this card in the Cut It Up Birthday Card and Time Out New challenges.  Thank you for stopping by!  Until next time, Hansi


Saturday, December 11, 2021

Snowflakes Along the Edge


To me, a clean and simple card is more than clean lines and white space, it should be fairly quick to make.  One of my ways of making quick(er) cards that don't look thrown together is to keep a stash of backgrounds.  Whenever I am playing with a new technique, I make lots of backgrounds and keep them all including the ones I am not pleased with.  There is usually a part that can be used to back a cut out window or to die cut a shape or sentiment.  I didn't like the one I used for this card, but the part along one side was pretty which was fortuitous because the AAA Cards challenge is to create a clean and simple card with the design along one edge and an optional twist of snow.  

First I used the Hero Arts Snowflake Edge die to cut a border on the front of the card.  Then I attached the background in question that I made had by smooshing ink spritzed with Hero Arts White Iridescent  Shimmer Mist onto watercolor paper behind the front of the card.  I embossed a sentiment from the Ornamental Christmas set by CZ Design for Simon Says Stamp in silver and added a strip of silver foil  cardstock from my scraps to compliment it.  I figured I was pushing the limits of CAS with layers, so I resisted the urge to put clear sparkles in the centers of the snowflakes. I also plan to enter this in the CAS on Friday Christmas Challenge and Addicted to Stamps and More Die Cut or Stencils Challenge.

Thank you for stopping by!  Until next time, Hansi


Friday, October 29, 2021

A Cool "Burnt Wood" Technique


I had been pondering all week how I would use the Paper Players sketch below when I saw this video by Gina K Design. 


Essentially you score a piece of cardstock, lightly swipe ink over it, set up the sandwich for embossing a die on your die cut machine, place the panel face down on the rubber mat and the stencil on top, emboss the stencil (which actually debosses it), and then swipe more ink over it.  Being in full Christmas card mode, I used a snowflake stencil from Stampin' Up.  Rather than use the colored pencil and Gamsol technique Gina used, I lightly colored the snowflake impressions with a colored pencil.  I cut 1.5 x 3.75 inch panels, swiped more ink round the edges, and stacked each on two layers of heavy Very Vanilla cardstock for dimension.  I attached the outer two panels first and then lined up the middle panel evenly between them.  HINT:  Pay attention to how the design lines up.  I had to perform a card-ectomy because I attached the middle panel upside down.

I had sort of an antiqued brass embellishment I wanted to use to anchor the sentiment, but it did not show well.  I tried coating it in gold embossing powder, but it still didn't show, so I tried platinum powder from Ranger which worked, but I did have to sacrifice some of the detail.  I like to think it evokes the look of old worn hardware on a wooden cupboard.  I used the same powder to emboss the sentiment and gild the edges.

This technique would work well for any masculine card.  Thank you for stopping by!  Until nexy time, Hansi

Thursday, October 28, 2021

Retro Christmas


This card was designed for the Aud Sentiments Christmas Sentiment, Christmas 24 Simply Snowflakes, and C.R.E.A.T.E. Christmas Non Traditional Colours Challenges.  I also plan to enter this into the Peace on Earth Christmas Challenge which is a new anything goes Christmas challenge that posts a mood board for inspiration if you choose to use it ,which I did for this card.


I started with a 9x12 sheet of bristol paper and sprayed it with Dina Wakely Ocean, Turquiose, and Night acrylic gloss sprays and Tim Holtz Brushed Pewter Distress spray until I liked the look.  Then I cut off a piece for this card and edged it with Majestic Violet Archival ink from Ranger.  I cut the sentiment from silver foil cardstock using the Tim Holtz Retro Merry Christmas die and the snowflakes from white and silver foil cardstocks using dies from Stampin' Up's Snowfall set.  I popped the panel up on a white card base and finished the card of with a purple sparkle.

Thank you for stopping by!  Until next time, Hansi


Wednesday, October 27, 2021

Moon Gazing Kitties


In my family of cat lovers Halloween cards must feature a cat or two or five...  You could say that this die cut from Penny Black is purrfect.  Actually the cats are in a horizontal frame which I cut off because I envisioned a nice big moon which wouldn't fit, but I am getting ahead of myself.

I started with a piece of Bristol and positioned a circle where I wanted the moon to be.  I used  blending brushes to apply areas of Bundled Sage, Shabby Shutters, Peeled Paint, Antique Linen and Speckled Egg Distress inks.  Next I used a fan brush to flick mostly small drops of water on the panel, let them air dry, and reapplied more ink to soften the effect.  I brushed more Antique Linen around the moon and Shabby Shutters  around the edges of the panel.  Next I brushed Speckled Egg in random spots though the Starry Night stencil from Hero Arts to give some texture and spookiness to the sky.  I removed the circle mask, lightly brushed on Colonial White pigment ink from Close to my Heart and Antique Linen and Old Paper distress inks to give the moon some dimension, and then outlined it with a Stardust Gelly Roll pen.  I stamped a sentiment from Close to My Heart's Purrfect Halloween set, attached the die cut and then attached the completed panel to a Very Vanilla cardbase.

I plan to enter this card in the Two Old Bats Anything Halloween, Simply Create Too All Things Spooky, Scary, Etc, Cut It Up Trick or Treat, and My Time to Craft! Halloween or Fall Colours challenges.

Thank you for stopping by!  Until next time, Hansi